There are many ways to get started with Travel Simulator and this page is here to give you all the information you need to do so easily.
Choosing which flavor is the right for you is pretty easy. If you are looking to use Travel Simulator as soon as possible in a preconfigured environment you can go to the online version or download the preconfigured virtual machine and import it into Virtual Box. If your goal is to have the most amount of fun, start contributing or simply dig deep into Travel Simulator, you can get the source code on Github.
Travel Simulator comes in different flavors :
All simulator modules are available as RPM packages. Do not hesitate to check for the needed packages on the linux packages search page. Follow the steps below to learn how to download and install those packages within one of the following Linux environment:
Linux users take advantage of the 'yum' command to search, install or update RPM packages:
yum search <module_name>
yum install <module_name>
yum update <module_name>
For instance, let's install the trademgen module in charge of the demand generation. Here is a list of the available trademgen packages. Try:
yum search trademgen
yum install trademgen
Good to notice! All trademgen dependencies (i.e. stdair and sevmgr) have been automatically installed too.
Finally, check that the installation has been successful by displaying the help of the trademgen module:
trademgen -h
First of all, you need to install and set up git within your working Linux/Unix environment.
If you are only interested by a specific module, or by individual component packages, you can find the module by module installation guide below.
Enter the chosen working directory, for instance:
mkdir -p ~/dev/sim
cd ~/dev/sim
Clone the metasim project from the github environment:
git clone git@github.com:airsim/metasim.git metasimgit
cd metasimgit
Copy and edit the metasim.yaml file with your own details (check you firewall settings if necessary):
cp metasim.yaml.sample metasim.yamlAdapt metasim.yaml to your environment. In particular, you may turn off the 64bit library option as well as the generation of the GCOV/LCOV tests and of the documentation:
cmake_args: '-DCMAKE_BUILD_TYPE:STRING=Debug -DINSTALL_DOC:BOOL=OFF \The avlcal and simlfs are not currently used; so they can be dropped without any other consequence.
-DENABLE_TEST:BOOL=ON -DRUN_GCOV:BOOL=OFF'
After editing the metasim.yaml file, it should look like:
# MetaSim configuration file
default_base_repo: 'git@github.com:airsim'
default_branch: trunk
cmake_args: '-DCMAKE_BUILD_TYPE:STRING=Debug -DINSTALL_DOC:BOOL=OFF \
 -DENABLE_TEST:BOOL=ON -DRUN_GCOV:BOOL=OFF'
publish_path: /dev/sim/metasimgit
components:
  - name: tvlsim
    repo: 'https://github.com/airsim/tvlsim.git'
    deps: [stdair, airrac, rmol, airinv, simfqt, airsched, simcrs, trademgen, sevmgr, travelccm]
  - name: simcrs
    repo: 'https://github.com/airsim/simcrs.git'
    deps: [stdair, airrac, rmol, sevmgr, airinv, simfqt, airsched]
  - name: simlfs
    repo: 'https://github.com/airsim/simlfs.git'
    deps: [stdair, airrac, rmol, sevmgr, airinv, simfqt]
  - name: avlcal
    repo: 'https://github.com/airsim/avlcal.git'
    deps: [stdair, airrac, rmol, airinv]
  - name: airinv
    repo: 'https://github.com/airsim/airinv.git'
    deps: [stdair, airrac, rmol, sevmgr]
  - name: trademgen
    repo: 'https://github.com/airsim/trademgen.git'
    deps: [stdair, sevmgr]
  - name: rmol
    repo: 'https://github.com/airsim/rmol.git'
    deps: [stdair, airrac]
  - name: simfqt
    repo: 'https://github.com/airsim/simfqt.git'
    deps: [stdair]
  - name: airsched
    repo: 'https://github.com/airsim/airsched.git'
    deps: [stdair]
  - name: travelccm
    repo: 'https://github.com/airsim/travelccm.git'
    deps: [stdair]
  - name: sevmgr
    repo: 'https://github.com/airsim/sevmgr.git'
    deps: [stdair]
  - name: airrac
    repo: 'https://github.com/airsim/airrac.git'
    deps: [stdair]
  - name: stdair
    repo: 'https://github.com/airsim/stdair.git'
    deps: {}
Good to know: if you are focusing on one specific module, you can remove everything else from the metasim file. Just be careful to check dependencies first!
For instance, if you are working on Travel-CCM only, you can keep only 'travelccm' and 'stdair'. In this case the metasim file should look like:
# MetaSim configuration file
default_base_repo: 'git@github.com:airsim'
default_branch: trunk
cmake_args: '-DCMAKE_BUILD_TYPE:STRING=Debug -DINSTALL_DOC:BOOL=OFF \
 -DENABLE_TEST:BOOL=ON -DRUN_GCOV:BOOL=OFF'
publish_path: /dev/sim/metasimgit
components:
  - name: travelccm
    repo: 'https://github.com/airsim/travelccm.git'
    deps: [stdair]
  - name: stdair
    repo: 'https://github.com/airsim/stdair.git'
    deps: {}
Then, you will need a minimum of development tools, including Ruby-gem based Rake, CMake, g++, Boost:
sudo yum -y install rake-rubygem cmake boost-devel gcc-c++ mysql-devel zeromq-devel soci-mysql-devel
(Git) check-out all the required components:
rake checkout
rake pull
Test the components:
rake offline=true check
Install the components:
rake offline=true install
ls -lhF workspace/install
Generate the tar-balls:
rake offline=true dist
ls -lhF /tmp/metasim
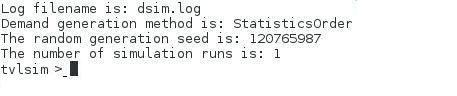
Run the local binary version to perform your first simulation:
cd workspace/build/tvlsimHave a look at the simulation logs:
./tvlsim/simulate
less simulate.logIf encounter any problem while opening a database connection, run the following batch scripts (before launching again the simulate script):
cd ../stdair
./db/admin/create_tvlsim_db.sh
./db/admin/create_airinv_db.sh
Please go to the tutorial section to learn more about the simulation tools available and how to use them.
Follow the steps below to download, build and install StdAir.
Get the StdAir library
Clone locally the full git project:
cd ~Build the StdAir project
mkdir dev
cd ~/dev/
git clone git@github.com:airsim/stdair.git stdairgit
cd stdairgit
git checkout trunk
cd ~/dev/stdairgitRun the Tests
rm -rf build && mkdir -p build
cd build
cmake -DCMAKE_INSTALL_PREFIX=/home/[user]/dev/deliveries/stdair-99.99.99 \
-DLIB_SUFFIX=64 -DCMAKE_BUILD_TYPE:STRING=Debug -DINSTALL_DOC:BOOL=ON ..
make install
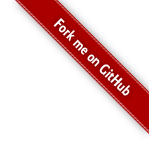
cd ~/dev/stdairgitAs a result, you should obtain a similar report:
cd build
make check
cd ~/dev/deliveries
rm -f stdair-stable
ln -s stdair-99.99.99 stdair-stable
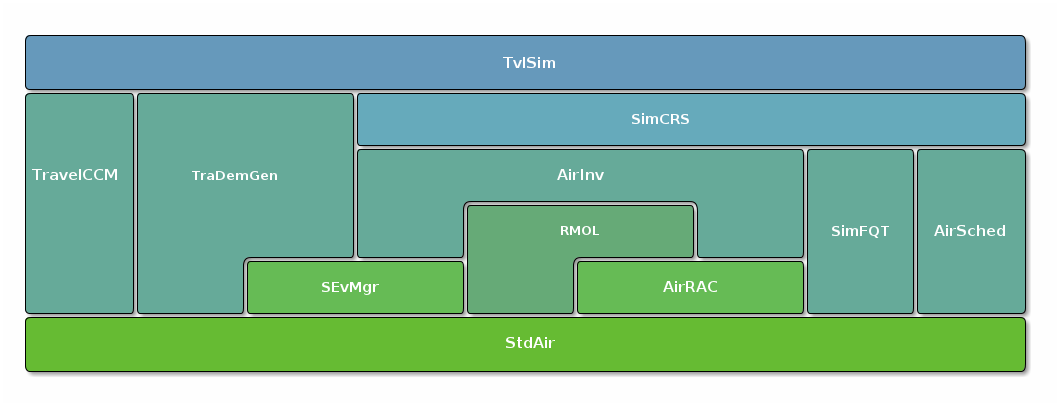
In order to install another specific module, you need to check its dependencies in the dependencies diagram. For instance, we are going to focus on the demand generation module TraDemGen.
Clone locally the full git project:cd ~/dev
git clone git@github.com:airsim/trademgen.git trademgengit
cd trademgengit
git checkout trunk
mkdir -p build && cd build
As illustrated in the dependencies diagram, the only dependencies of TraDemgen are the StdAir and SEvMgr libraries. That is why the StdAir and SEvMgr releases, which will be used to build the Trademgen component, need to be specified:
cmake -DCMAKE_INSTALL_PREFIX=/home/[user]/dev/deliveries/trademgen-99.99.99 \Of course, you are supposed to have previously cloned, built and installed the SEvMgr library following exactly the same process as for StdAir. Do not forget that SEvMgr depends on StdAir as well!
-DWITH_STDAIR_PREFIX=/home/[user]/dev/deliveries/stdair-stable \
-DWITH_SEVMGR_PREFIX=/home/[user]/dev/deliveries/sevmgr-stable \
-DLIB_SUFFIX=64 -DCMAKE_BUILD_TYPE:STRING=Debug -DINSTALL_DOC:BOOL=ON ..
Build, install the demand generation library and perform tests:
make & make install && make check
Run the local binary version to generate your first booking requests:
./trademgen/trademgen_generateDemand -bIf encounter any problem while opening a database connection, run the following batch scripts (before launching again the generateDemand script):
./workspace/build/stdair/db/admin/create_tvlsim_db.shPlease go to the tutorial section to learn more about the simulation tools available and how to use them.
./workspace/build/stdair/db/admin/create_airinv_db.sh
tvlsimIf you chose to work within the packaged metasim component (where all simulation modules are available), the correct way to launch the binary is:
cd ~/dev/metasimgit/workspace/build/tvlsim/tvlsim./tvlsimFinally, when dealing with all the modules independently, you can choose:
cd ~/dev/tvlsimgit/tvlsim
./simulate
cd ~/dev/deliverie/tvlsim-99.99.99/bin/After running the script, you can check that a log file, named after the script, has been created in the current directory and have a look at it:
./simulate
lsless simulate.log
./simulate --help
./simulate --builtin
./simulate
./tvlsimAt this step, you should see something similar to the following screen shot:
helpTo quit the interactive scenario:
quit